Blind Line & College Ave
Orangeville, Ontario

Use a Raspberry Pi Pico POST monitor and the Coolshrimp web POST code tool to read Xbox One boot stages and narrow down no-boot faults.
Xbox One POST codes are the console's boot progress markers. When a board powers on but does not finish booting, the POST bus can tell you where it stopped so you are not guessing blindly.
This is board-level troubleshooting. Use standby power carefully, confirm ground, avoid shorts on the FACET header, and do not solder to a powered console.
During startup, the Xbox Southbridge steps through many hardware checks. A POST reader listens to the console's I2C POST bus and prints the current hexadecimal code. If the console hangs, the last code is your clue for the area to inspect next.
For Xbox One, the open-source PicoDurangoPOST project turns a Raspberry Pi Pico into a POST-code monitor. The project supports Xbox One Phat, Xbox One S, and Xbox One X through the FACET connector, and Xbox Series S/X through AARDVARK.
The Pico needs the PicoDurangoPOST firmware before it can read anything. This quick guide is also built right into the web tool under Flash Firmware, with direct firmware downloads.
Download the correct .uf2 file from the latest PicoDurangoPOST release (or straight from the web tool), then drag & drop it onto the RPI-RP2 drive:
durango_post_monitor.uf2 — Raspberry Pi Pico (RP2040)durango_post_monitor_pico2.uf2 — Raspberry Pi Pico 2 (RP2350)Browsers can't write directly to USB drives — download the .uf2 first, then copy it onto the RPI-RP2 drive yourself. The Pico reboots into the firmware automatically once the copy finishes.
Connect the Pico to the console's POST debug points (the web tool's Wiring Guide popup carries the same reference):
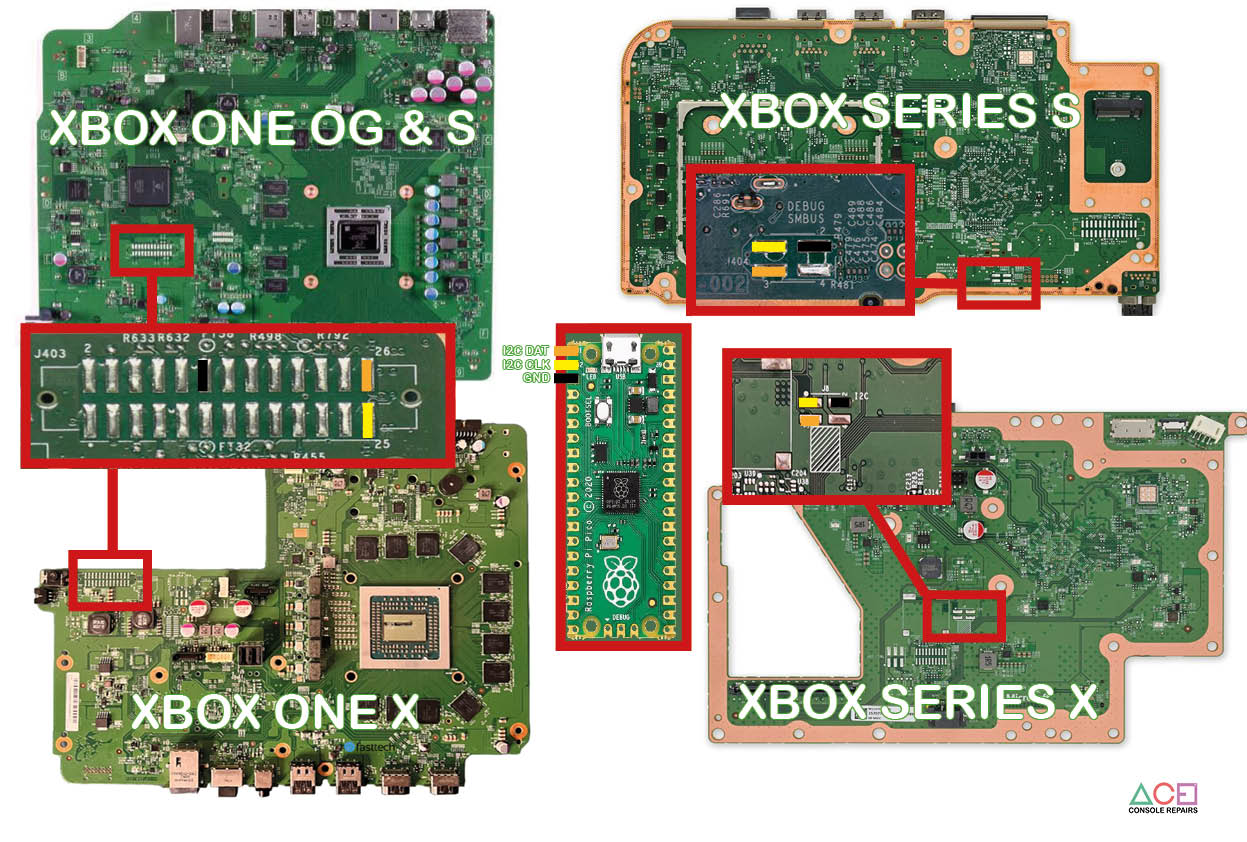
Where to tap the POST bus on every board revision — Xbox One OG & S, One X, Series S and Series X — and the matching Pico pins (I2C DAT, I2C CLK, GND).
If nothing appears, check wiring and make sure the console has standby power. PicoDurangoPOST also has a small menu: press CTRL+C, type help, then use post to return to monitoring.
Once the Pico gives you a code, open the web tool and enter the POST value exactly as shown. The tool is handy because it works in the browser and keeps the code lookup beside your serial monitor.
A POST code is not a magic "replace this chip" answer. Treat it as a direction: power rails, storage, RAM, Southbridge, APU, firmware, or a communication path. The best workflow is to combine the code with measurements and visible symptoms.
This guide is based on the PicoDurangoPOST project documentation. The project notes that firmware v0.3.0 removed some older name-display behavior in favor of XboxPostcodeMonitor, but the Pico still monitors the POST bus and prints codes over USB serial.
Wire-only R-JTAG install diagrams for phat Xbox 360 consoles — for installs without QSBs, including the diodes you'll need.
RGH2+ install on Slim Corona v1–v2 consoles with the CR4 XL — wiring, flashing and setup, with latest-dashboard support.
RGH2+ install on Slim Corona v3–v6 (Winbond RAM) consoles with the CR4 XL — wiring, flashing and setup, with latest-dashboard support.
R-JTAG+ install on phat Zephyr, Opus, Falcon and Jasper consoles with the CR4 XL — wiring, flashing and setup, with latest-dashboard support.

Sign up and get notification about new services, promotions and sales.
